A Whole New Language
When I had my dance studio, correct terminology was very important. When I started quilting, I learned a whole new set of terminology. It was like learning a whole new language. Sashing …. what’s that? Sandwiching …. Are we going to eat the quilt? It seems so confusing. When I start a beginning quilt class, I start by teaching the terminology of quilting. I’m going to try to explain it as best I can for those quilters who may not have access to a quilting class with a good instructor.
Piecing – The process of sewing different pieces of fabric together to make a block.
Block – The pieces of fabric put together into a square of desired size ie; 6″, 8″ 10″ etc.
Sashing – The narrow fabric stitched between the block to divide the blocks and put into a single row and again into multiple rows.
Pieced Top – The various blocks put together with or without sashing to make the completed pretty top of quilt.
Batting – The lining between the pieced top and the backing. Usually all cotton or cotton polyester blends of various thickness depending on quilter’s preference.
Backing – The fabric used for the back of a quilt. Can be plain or print fabric to match or blend with fabric used for pieced top.
Sandwich – The process of putting the pieced top layered with the batting in between the pieced top and backing fabric to make 3 layers.
Quilting – The process of sewing the 3 layers together to make one quilt or blanket as some people call it. This can be done by hand as they did in the old days, by home sewing machine or by a long arm quilting machine.
Binding – This is the fabric strip that is used to finish off the raw edges of the quilt after the quilting process is finished and the quilt is “squared up”
Square up – The process of making all sides even and perfectly square so that all blocks go together evenly. In the case of the finished quilt, squaring up takes off all the raw edges to make quilt smooth and even to prepare for binding.
There is more terminology that I could give you but these are the basics. I will give you more as we discuss individual styles of quilts. These are the most used.
Until the next time …. Happy sewing!
**PLEASE SCROLL DOWN TO SEE PAST BLOGS. THANK YOU


 I taught a free motion quilting class yesterday and I was explaining the difference between the thread sizes. For some people, thread thickness can be very confusing. It’s hard to compute in our brains why the higher the number, the thinner the thread and the lower the number the thicker the thread. I am going to try to simplify which is which.
 neck shirt to place the TOP of the design. If you have embroidery software, then print out your template, cut around the design and place on shirt where you want the design to be. If the top of design is 3″ down from top of crew neck then mark your center, top and side marking lines and position in your hoop.(For children’s shirts measure 2.5 inches down)
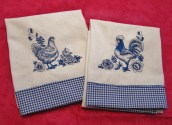
 Have you ever seen a towel with the design so high up that you can only see half the design when hung on an oven handle? Or looked at a T shirt with the design sitting on someone’s belly button? Well, there is a formula for proper placement of designs on everything.
 marking from the center point. That 3 inch also gives you room to add a pretty fabric band, or ruffle or ribbon trim along the bottom. If you have software then print out a template, cut around the designs and place on towel so you can measure up 3 inches to bottom of design. Then do placement markings with an erase away marker.
  I’ve talked a lot about quilting and embroidery on quilting, but I want to take a break and talk about embroidery old and new. Embroidery today is a far cry from what it used to be. In the “olden days” embroidery was done by hand. It was and still is beautiful but took a lot of patience and was time consuming. . If it was machine embroidered on clothing or linens, it was done on a commercial machine and was expensive to buy. You were also limited by whatever designs they sewed on the item.