Way back when I was 8 years old, my Grandmother bought me my first sewing machine. It was that darling little black Singer Featherweight Machine. I still have that same little gem, and I love it as much now, as I did when I first got it. That special little machine has seen a lot of stitch miles over the years and it still purrs right along, thanks to our service tech Rob, at Expert Sewing Center in Port Charlotte, FL where I teach.
These machines have regained popularity thanks to the quilters around the country. They are light weight to take to a class or sewing bee. They only sew a straight stitch, but that is all you sew when piecing a quilt.
For many years getting service and parts for them was a problem, but not any more. People on Ebay started finding spare parts and selling them, also machines that they found in garage sales, or old shops, etc. Of course you never knew what condition they were in so you take your chances buying one of those.
The original price of this machine in 1950 was $150. A few years ago, quilters were paying $350 t0 $500, depending on the condition and who was selling them. Now you are looking at paying any where from $800 to $2000 depending on the year and condition and if it has the original case, parts, manual and accessories. The ones made back in the 30’s and 40’s are the most expensive ones.
Getting parts has been a problem, but not any more. I discovered a website that caters only to the Featherweight. Of course, it is called the Featherweight Shop. Here’s the link https://singer-featherweight.com/ They have EVERYTHING. Parts, machines to buy, manuals, feet, cleaning supplies, etc. They have video tutorials that show how to thread the machine, clean it, service it yourself, and the history of the machine to name a few. It’s a family operated business and they eat sleep and breathe the Featherweight.
If you are a fanatic about your Featherweight, like I am, or you are interested in maybe buying one, then you must check out this web store.
As always, I will be doing more blogs in the future and I genuinely hope you enjoy them. Please pass my link on to your sewing friends. I try to make them informative and help you to enjoy what you are creating. If you haven’t already, please sign up to follow my blog as Google likes us bloggers to have followers. You will get an email each time I publish a new blog. Also, please check out my past blogs. They cover things like, stabilizer, threads, needles, etc. Use it as a reference source. Also, if something new or different has come on the market, I will revise that particular blog, so you are always up to date.
Description;Scissorsare hand-operated shearing tools. A pair of scissors consists of a pair of metal blades pivoted so that the sharpened edges slide against each other when the handles (bows) opposite to the pivot are closed.
They say you are only as good as your weakest tool. Well that holds very true for scissors. There are many types of scissors and I think I own them all. One pair of scissors (or shears as they are often called) will not do it! Most of your better scissors are forged stainless steel and hold their sharpness.
Dressmaker Shears;These are generally 8″ in length, and bent, but you can get them in a 5 or 6 inch length. These are used for cutting out sewing patterns for clothes.
Embroidery Scissors; are generally small, curved or flat, and very sharp. I have several types. Flat is great for trimming threads and small spaces. and are 4 or 5 inches long. There are single curved ones that make it easier to cut into small tight spaces when cutting around applique’ designs. Doublecurved ones are great for trimming embroidery threads in the hoop, and for trimming around applique’ without taking a project out of the hoop.
Small Sub Nose Scissors; These are great for trimming threads under a quilt so as not to accidentally cut your fabric. You can also take them on a plane because they have rounded tips instead of sharp pointed tips. If you like to do needle point or hand embroidery while traveling, then having a pair of these is a great idea.
Duckbill Scissors;These are those funny looking ones that have a wide rounded side and a regular flat side. These are wonderful for trimming applique’s. The rounded part goes next to the background fabric while the flat straight side is on top of fabric so you can see where you are cutting. These come in various sizes so buy the size that works for you. I have 3 sizes and I use them all.
Brands; There are many great scissors out there. It is really a matter of preference. Gingher is one of the better brands and maintain their sharpness quite well. They are a little pricey, but if you watch for sales, or shop online, you can generally get a good deal. Fiskars are a medium priced, nice quality scissor you can find at Joanns and many department stores. Wiss is an old line brand that you don’t see as much, but has been the “go to” scissor for tailors for many years. The man who taught me to do tailoring introduced me to this brand. It was his favorite. I bought a pair of Wiss Dressmaker 8″ shears and I’m still using them, have never had them sharpened, and they still cut beautifully. There is a newer brand out that is advertised in all the craft and quilting magazines called Kai. They come in all sizes and shapes and I have several curved ones that I use to cut applique embroidery pieces on embroidery designs, and for cutting out fabric pieces when doing cut work machine embroidery. They have a slight serrated blade that is sharp and holds the fabric nicely.
There are also many novelty scissors out there that are fun for clipping threads, etc. Whatever your needs, I can only suggest you buy good quality scissors for whatever project you are working on. The success of your project depends on whatever your weakest tool is. Good quality scissors will make any project go easier. DO NOT use these quality scissors on paper, – as paper will dull your scissors. Buy cheap scissors for the kids and your husband, and keep your sewing and embroidery scissors in a safe place only you know where they are. (:-)
Rotary cutters are a whole new kind of cutter, used mainly by quilters and machine embroiderers. Most all brands of rotary cutters are excellent quality. They vary in style and that is a matter of preference. Just change your blades often, or cutting through the fabric can become an issue.
I hope you enjoy reading about sewing, quilting and embroidery. Please sign up to follow my blog. As I have said, Google likes it if we bloggers have followers! Also, please pass on my link to your sewing friends so they can sign up and be informed, too. Check my other blogs as I talk about needles, stabilizers, thread, design project ideas and many more subjects. I hope you will find my past and current blogs to be informative and educational.
If you have any questions or suggestions for blog ideas, please let me know. I want to make this blog interesting, informative and educational.
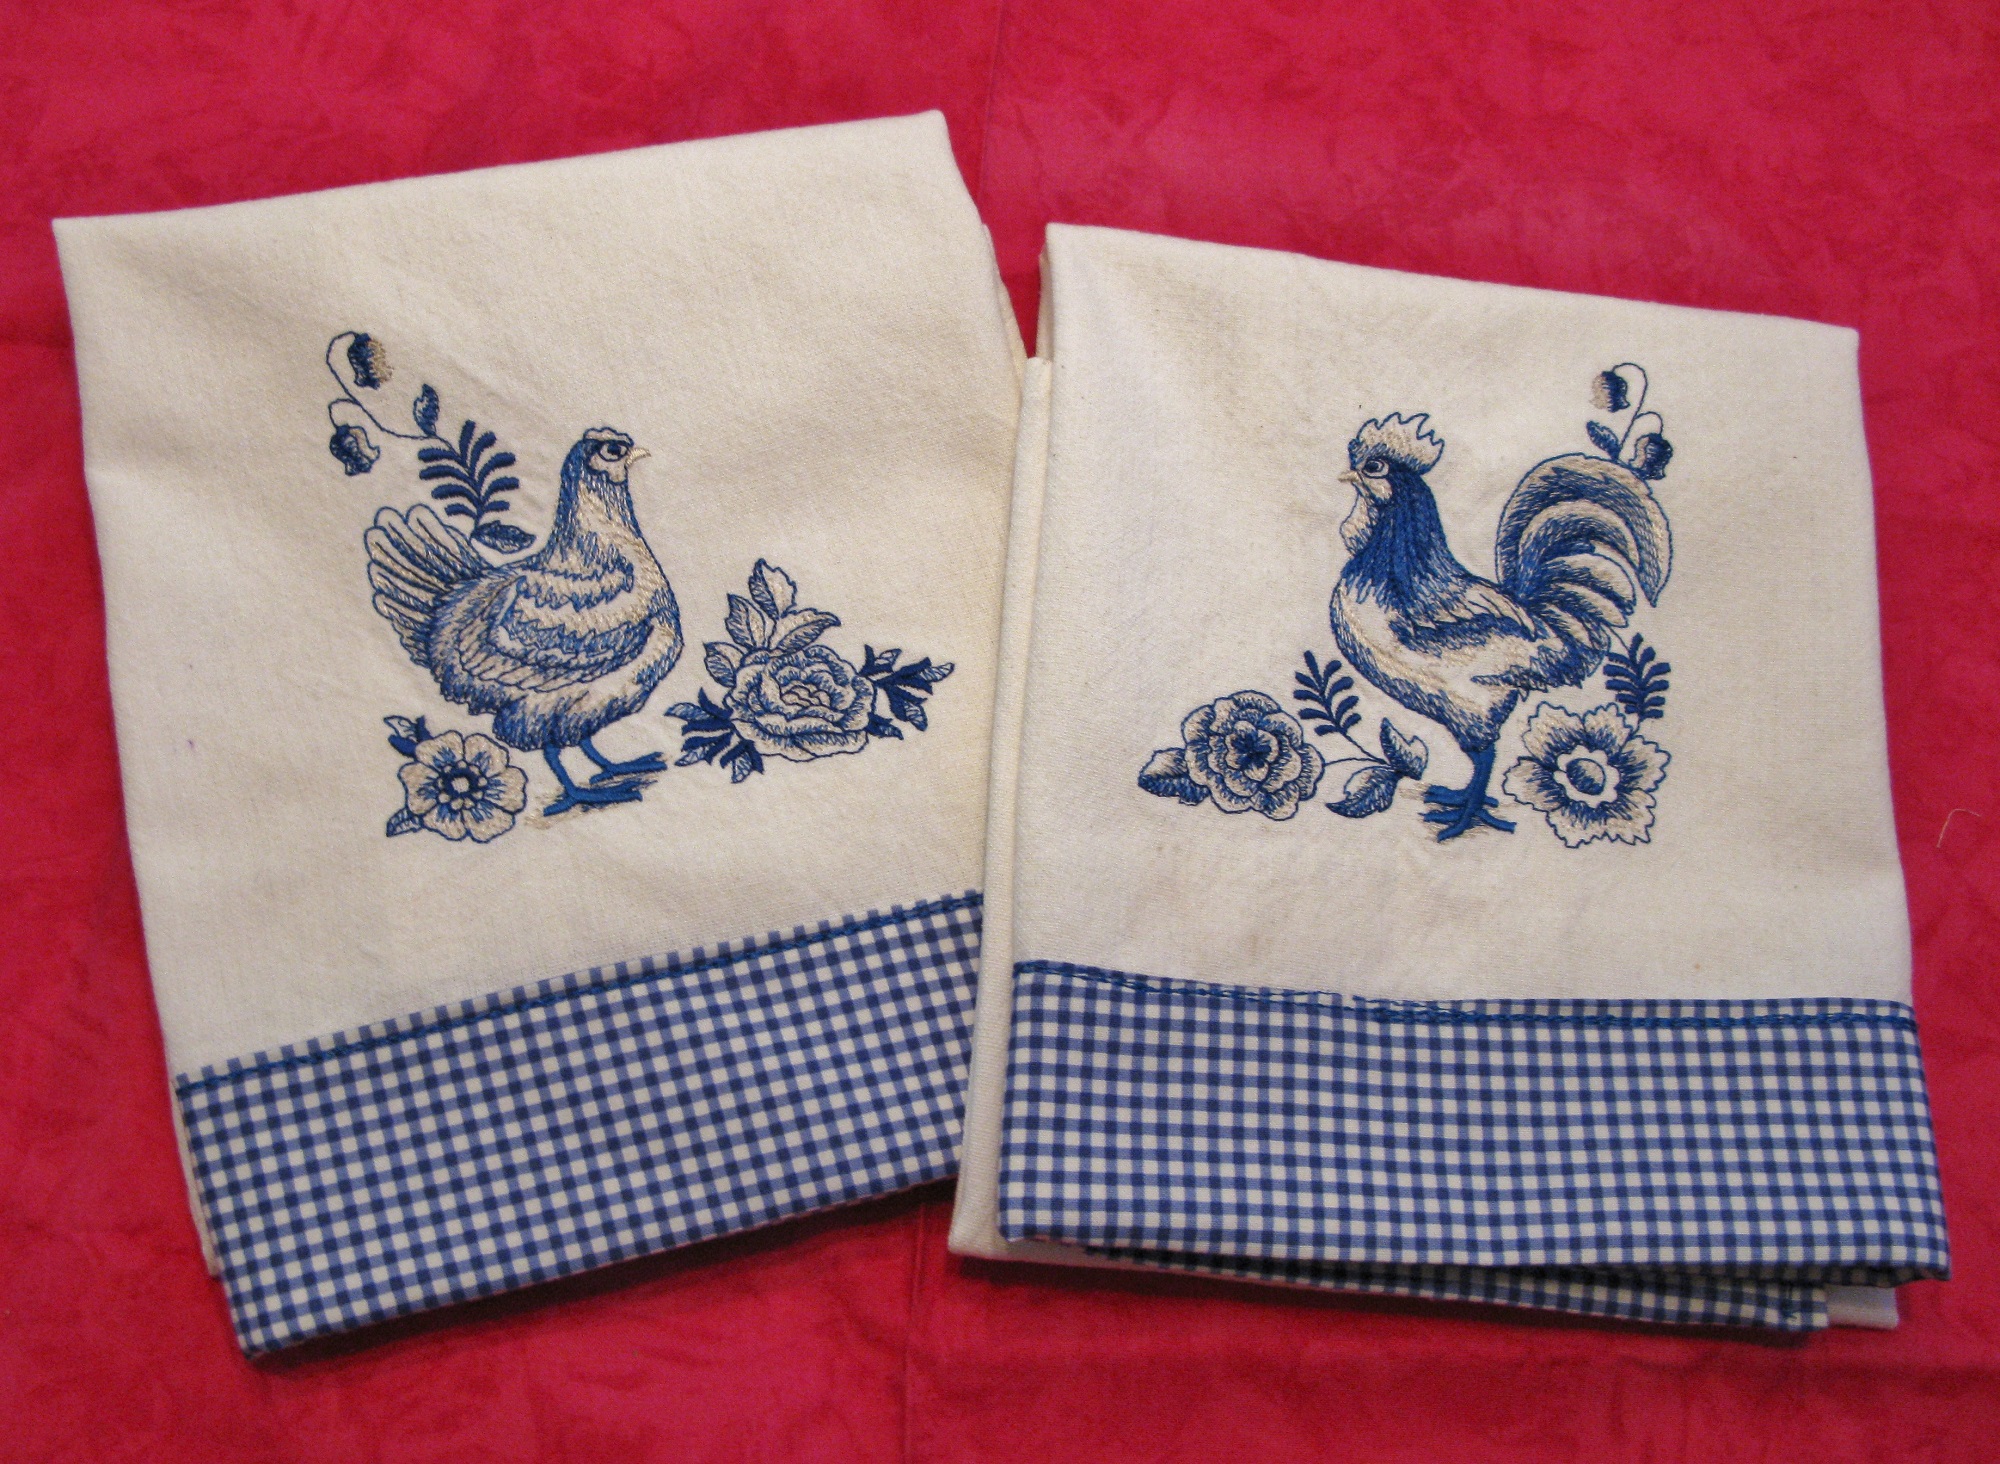
I think this is one of my most asked questions in class. Stabilizers have come a long way from the early days of using paper or coffee filters to stabilize fabrics in an embroidery hoop. That’s going way back in time! I’ve been sewing since I was a young child, but doing embroidery for the past 12 years. Times have changed, even from when I started, and those changes are wonderful for those of us who do home embroidery. The quality of stabilizers is amazing and when you use the proper stabilizer for your project, the outcome is beautiful. You can take a plain piece of fabric or linen and make a high end style pillow that would cost you up to $100 from a home decor boutique store. Your cost? The price of a yard of fabric, your embroidery supplies, and your creative imagination. You can design a kitchen tea towel and personalize it to give as a gift. You can embroider a beautiful monogram on a set of towels for a lovely wedding gift. All these projects use a different stabilizer to make them look professional.
There are two main things to remember. If the fabric stretches, use a cutaway stabilizer. If it doesn’t stretch, you can use a tearaway. That’s your starting point. If you keep that in mind, most of your problems are solved.
Let’s look at Tearaway stabilizers, of which there are many. There is light to medium weight tearaway which can be used on designs that are not overly dense, or they can be used to “float” under another stabilizer when a design has more than 10,000 stitches.
Another one is the “sticky back” tearaway. Floriani makes one called Perfect Stick. This particular stabilizer is half water based and half fiber based. This means that the portion under the stitches will stay even if the rest is washed away. I like this one for a lot of things like embroidery on quilting fabric, tea towels, small terry kitchen towels, etc. This stabilizer, as I understand, has a silicone base so it won’t gum up your needle. RNK Distributing makes this and many other stabilizers under the brand names of Floriani and Jenny Haskins. They also have one called Wet n Stick. With this stabilizer, you dampen the stabilizer once it is hooped, and a little water activates the sticky quality. Then “float” and stick down the item to be embroidered. This one is great for heavier towels. Once you are done stitching, dampen the back of the stabilizer and it will activate the water property again, so it will peel away and tear away easily. Again, it is half water soluble and half fiber.
You can also get iron on tearaway that you fuse to the back of the fabric, then hoop fabric and stabilizer as one. For the most part, it is always best if you can hoop the stabilizer and the fabric together. But… there are times when hooping the fabric is not good for a variety of reasons, like a quality towel or velvet which could get “hoop burn”. Or the fabric is too delicate, so floating is the best option. Floriani has a sheet inside the tube of each stabilizer roll that tells you how to use that particular one.
Stretch fabric like T-shirts, knits, sweatshirts and some cottons need a cutaway stabilizer. A prime example is a T-shirt with lots of stretch. This needs No Show Mesh cutaway. It comes in fusible and non fusible. Several companies make this type, but I happen to like Floriani because it comes in 3 color options, white, beige and black. I generally use beige or black depending on the fabric color. Because you cut it away about 1/8th inch to 1/4th inch from the outside edge of the design, the beige doesn’t show through the light colored T-shirts.
You can also get a cutaway that looks like tearaway, but can’t be torn. This one is great for heavy sweatshirts, or jackets and will hold a large design with a heavy stitch count. This same cutaway is great to use behind a design that you want to turn into a decor picture in a frame or wall hanging.
There’s one more to talk about. water soluble stabilizers. These are great to use for Free Standing Lace (FSL), or for embroidery on organza, or sheer fabrics that you don’t want a stabilizer to show on the back. I like the kind that looks like funny fabric or cheese cloth. It’s sturdy and one or two layers can hold a LOT of stitches. Sulky also makes a heavy weight plastic or opaque looking stabilizer that is also good for FSL. There is another kind that looks like Saran Wrap. This is a “topper” that you put on top of your design to hold down the nap while stitching out your design. Sulky calls it a stabilizer, but it is not to be used for holding stitches. The light or medium weight is to be used only as a topper. You pull it off and if you have any little nooks and crannies that you need to get out, a wet cue tip will do the trick. There is also a topper that you melt off with a dry iron. Follow instructions carefully to know how to use it properly. Floriani calls theirs Heat N Gone
One of my favorite things to do is embroidery on towels. Below is a You Tube video with some excellent instructions on stabilizing terry or velour towels. The educator is Ellen Olsten and she is wonderful. I had the pleasure of meeting her when she came to our store, Expert Sewing Center, with a Sulky sit n sew event. Watch and enjoy!
I welcome comments or questions and would love to have you “follow” my blog, so please click the follow button, fill in your email, and you will receive a notice each time I publish a new blog. Don’t worry, no emails are ever sold
Please check out some of my past blogs. I try to make them informative and educational. It is my delight to help people to enjoy and learn. Sewing has been a passion of mine since I was a young child. There is a blog on threads, or one on needles, or ideas for gifts and more. Also check out my creative links. These are businesses I do business with. They are all good quality companies.
Here are some ideas for you to make quick holiday, hostess gifts, birthday gifts or cherished Christmas gifts for family and friends to use every year.
I said I would start adding You Tube videos that I thought my subscribers would like. Here’s the first one and it comes from our friends at http://www.emblibrary.com …I love these cute and fun napkins that can be made with cotton or washable linen fabric, and you can make them for any occasion. If you are an embroiderer, put a cute embroidery design that fits whatever holiday you choose, or a fun any occasion design that you can use year round. Not an embroiderer? How about an applique’ design. They call them Christmas Tree napkins, because of the fold, but with a non holiday fabric or embroidery design, they would just look charming on your table. Let’s face it, nothing says elegance like a cloth napkin.
How about a simple monogram on napkins you purchase at stores like Tuesday Morning? They are elegant and can be used year round.
Kitchen dish towels machine embroidered with a pretty design, make a great useful gift. Make them fancy by putting on a bottom trim of fabric, rick rack or ribbon. Pot holders are always another useful gift. Why not make them to match your kitchen towel, and you have a lovely Holiday, house warming or party gift. Better than a bottle of wine. Better yet, wrap the towel around the wine and tie with a pretty bow. Sounds good to me.
Place mats are always fun sewing project. Four can be made with a yard of top fabric and a yard of complimentary back fabric. Sandwich them with Annie’s Soft n Stable, add a decorative binding, and you have a one of a kind gift. Are you a quilter? Make a patchwork top and you have something really special. Before putting the binding on, quilt it with cross hatching (or in the ditch) and you have a very professional looking gift. Again make matching pot holders to finish it off.
Have a golfer in your family or circle of friends? How about a golf towel with a cute embroidered design on it and maybe even a name or monogram. You can purchase quality golf towels from All About Blanks or Discount Embroidery Blanks. They have beautiful velour tops with terry back for wiping hands or golf clubs. Towels also come ready with grommet and hook to attach to golf bag and they have a wonderful variety of colors.
Don’t forget bath room towel sets. Fingertip towels with a pretty machine embroidered design or monogram are great for a powder room. Bath towel sets with an elegant monogram is always a nice Christmas present house warming or wedding shower gift.
Don’t forget to machine embroider T-Shirts, Sweat shirts, and jackets to dress up your own clothes or for someone else. Kids love T-shirts embroidered by Grandma (or Grandpa) Be sure to put Sulky Tender Touch or Floriani Dream Weave on back of design to cover stitches so the threads inside the shirt don’t touch the skin.
These are just an idea of quick gifts that will be appreciated. If you only sew, then besides place mats, how about fabric bowls, rope bowls or wall hangings.
Ok. Now that I’ve inspired you, lets get sewing. I welcome comments or questions and would love to have you “follow” my blog, so please click the follow button, fill in your email, and you will receive a notice each time I publish a new blog. Don’t worry, no emails are ever sold.
PS. All kitchen towels, golf towels, and finger tip towels can be purchased at All About Blanks, or Discount Embroidery blanks. See Creative Links.
Until the next time….. happy sewing!
PLEASE SCROLL DOWN TO SEE PAST BLOGS OR CLICK ON THE “PAST BLOGS” LINK ON THE RIGHT.
With all the heat we have been seeing around the country, it may seem a little premature to be talking about plaid flannel or even cotton plaid. But, the weather will get cooler and those flannel PJ’s, quilts and throws will be looking pretty cozy soon. Even in the south there are times when flannel feels awfully good. Flannel backing on a cotton top quilt makes your quilt feel so nice and snugly when curled up on a couch with hot chocolate and a good book or movie. Flannel quilts give your home a country cottage feel and it doesn’t matter if your decor is modern, sleek or country. Flannel also makes nice rag quilts and you don’t need batting in between the top and backing unless you live in the frozen north of Greenland or even Northern Canada where temps average 20 or 30 below.
Flannel does need special handling and if you don’t know these things, a beautiful quilt, that you put a lot of work, heart, and soul into, can end up looking awful over time. The most important part of working with Flannel is the prep work. It’s vital to not only pre-wash, but also machine dry and starch, because Flannel shrinks significantly. Continue reading “The Do’s and Don’ts of Plaid”
I just did a class where I must have had 10 different questions about thread. So, I thought I would update and re-run this blog with the hopes that it may answer any questions you may have.
When I teach a free motion quilting class and I try to explain the difference between the thread sizes, I get lots of question. For some people, thread thickness can be very confusing. It’s hard to compute in our brains why the higher the number, the thinner the threadand the lower the number the thicker the thread. I am going to try to simplify which is which.
Normal sewing thread is usually 50 weight thick. This is the standard in the industry. This is the normal thread you buy at Joann’s or wherever you buy your everyday sewing or quilt piecing thread.
To sandwich my quilts together I like to use a 30 weight quilting thread Iuse a 90-14 needle or higher. It’s a little thicker and shows up nicely when you are machine quilting. There are many good brands of thread but my personal preference is Sulky quilting thread solid or variegated, or King Tut solid or variegated. King Tut has nice large spools. Great if you are quilting a large quilt that will use a lot of thread.
There is one more thread for quilting. It’s a 12 weightthat is much thicker and nice for hand quilting. It gives a nice texture to the finished quilt. If you use in a machine I would use a top stitch needle like a 90-14 or 100-16
Embroidery thread is 40 weight. This is the standard for anyone using embroidery thread for their machine embroidery designs. This thread is a little thicker than your normal sewing thread to give you more depth in your design. It can also be used for quilting your quilt sandwich when used on a machine. It has more sheen and can look very nice on the more modern style of quilts. For quilting you would want to use the same weight thread in needle and bobbin.
60 weight thread is what you use in the bobbin of your machine when doing machine embroidery. It comes in several colors ie; white, tan, cream, grey and black. You can buy it in pre-wound packets or your can buy Finishing Touch bobbin thread in spools that you can wind on your own machine if that’s what you prefer. Also, some machines don’t like pre-wound bobbins. My Brother Quattro and Dream machines love both pre-wounds as well as bobbins I wind myself. There is also a 60 weight cotton thread you can buy to use in your bobbin if you want the back and front of your project to look the same such as in lettering. 60 weight cotton thread is also nice to use when sewing applique’s on the machine or by hand. If you are machine embroidering small lettering, like on a recipe dish towel. then you may want to look into using a 60 weight embroidery thread. It has a nice sheen and softer hand for small fonts. You can use the same thread top and bottom if you like. That’s what I do. It gives me a nice finish.
The last one I want to talk about is a beautiful thread you can use for heirloom sewing and for tacking down appliques. It’s 100 weight thread. It’s the finest thread on the market. It can be purchased in cotton and silk. Very delicate and lovely when sewn.
I hope this helps any one who may have been confused about thread weight and the use of each type of thread. Except for embroidery I always use the same weight thread in my needle and bobbin. My favorite threads for sewing and piecing are Aurifill, Mettler, Superior, Sulky and Gutterman. For embroidery threads I like Floriani, Isacord, Brother Madeira, Robinson Antone and Sulky. All are excellent brands.
If any one has any questions please email me through my contact page. I will try to answer questions as best I can and if you have any suggestions for future blogs, I would love to hear them. I would also like it if you click the follow button (google likes it if we have followers) and check out the creative links of businesses I buy from.
Until next time….. happy sewing!
PLEASE SCROLL DOWN TO READ EARLIER BLOGS. THANK YOU.
Throw pillows on a couch, a bed or chair are an inexpensive way to add color and decorate a room. The pillows you buy can be quite pricey costing upwards of $40 to $80 or more, depending on what you get. If you want something nice that will last, you will spend a lot of money for them. By making your own, you can also customize your pillow with embroidered words and sayings that mean something to you or the person you are giving it to. Maybe do a small wedding pillow, a friendship, daughter, Mother, Father, or Grandparent design. They will cherish them forever.
I’ve been making pillows for my military friends and they are loving them. I found some panels with the different branches of the service and I make and quilt the pillow for my friends and their particular branch. Military guys and gals are very proud of their service and this is a way you can honor them. Want to just make a decorative pillow? That’s OK. I’m going to give you a formula that will serve you well for any design.
First; make your pillow top. This can be as simple as a piece of fabric you like, a panel, or a pieced quilt block. You can also do a beautiful embroidery design on a piece of fabric and then turn it into a pillow with the following steps.
Second; Cut your top to the size pillow you want to make. Pillow forms come in all shapes and sizes. You can get them at any craft or fabric store, like Joann’s. I get mine there when they have a pillow sale, or save with my 40% off coupon. The sizes I like best are 12″, 14″ and 16″ square. If you want a bolster size, then 12″ x 16″ is a nice size. Whatever size you decide to use, I cut my top to the same size or 1/4″ bigger all around. It depends on the weight of fabric and if batting is used.
Third; “Sandwiching” your pillow top. I like to make a pillow top in layers. I start with muslin for the lining, then batting for body and last I put the finished decorative outside of the pillow on top. Then I quilt the three layers with a simple free motion meander pattern or a quilters “cross hatch” pattern. “Cross hatching” is the simplest way to finish off the top. It only involves straight stitching and it can be done on any size machine. All you need is an erasable marking pen and a straight stitch foot or a walking foot.
Fourth; Planning the back of the pillow. There are a few ways you can finish the back. 1. is a simple way of just cutting the back fabric the same size as the front and with right sides together, sew all around pillow leaving about 3 or 4 inches open at the bottom. I suggest sewing a straight stitch first, then go around again with a zig zag stitch to finish off the edges. (you can use a serged edge if you have a serger.) I do this, then I do the back with the same three layers and cross hatch that also to give the pillow cover body. Once it is all stitched, turn right side out, stuff your pillow form inside and hand stitch the opening to finish off.
2. is the “envelope” style back where you use 2 pieces of fabric wrong sides together with your folds overlapping about 2 inches in the center. Then you attach the the back to front (again right sides facing each other), and you can stitch all the way around four sides. Once done, you turn it right side out using your fold over and again, stuff your pillow form inside and you are done. This makes it easy to remove pillow case to wash when needed.
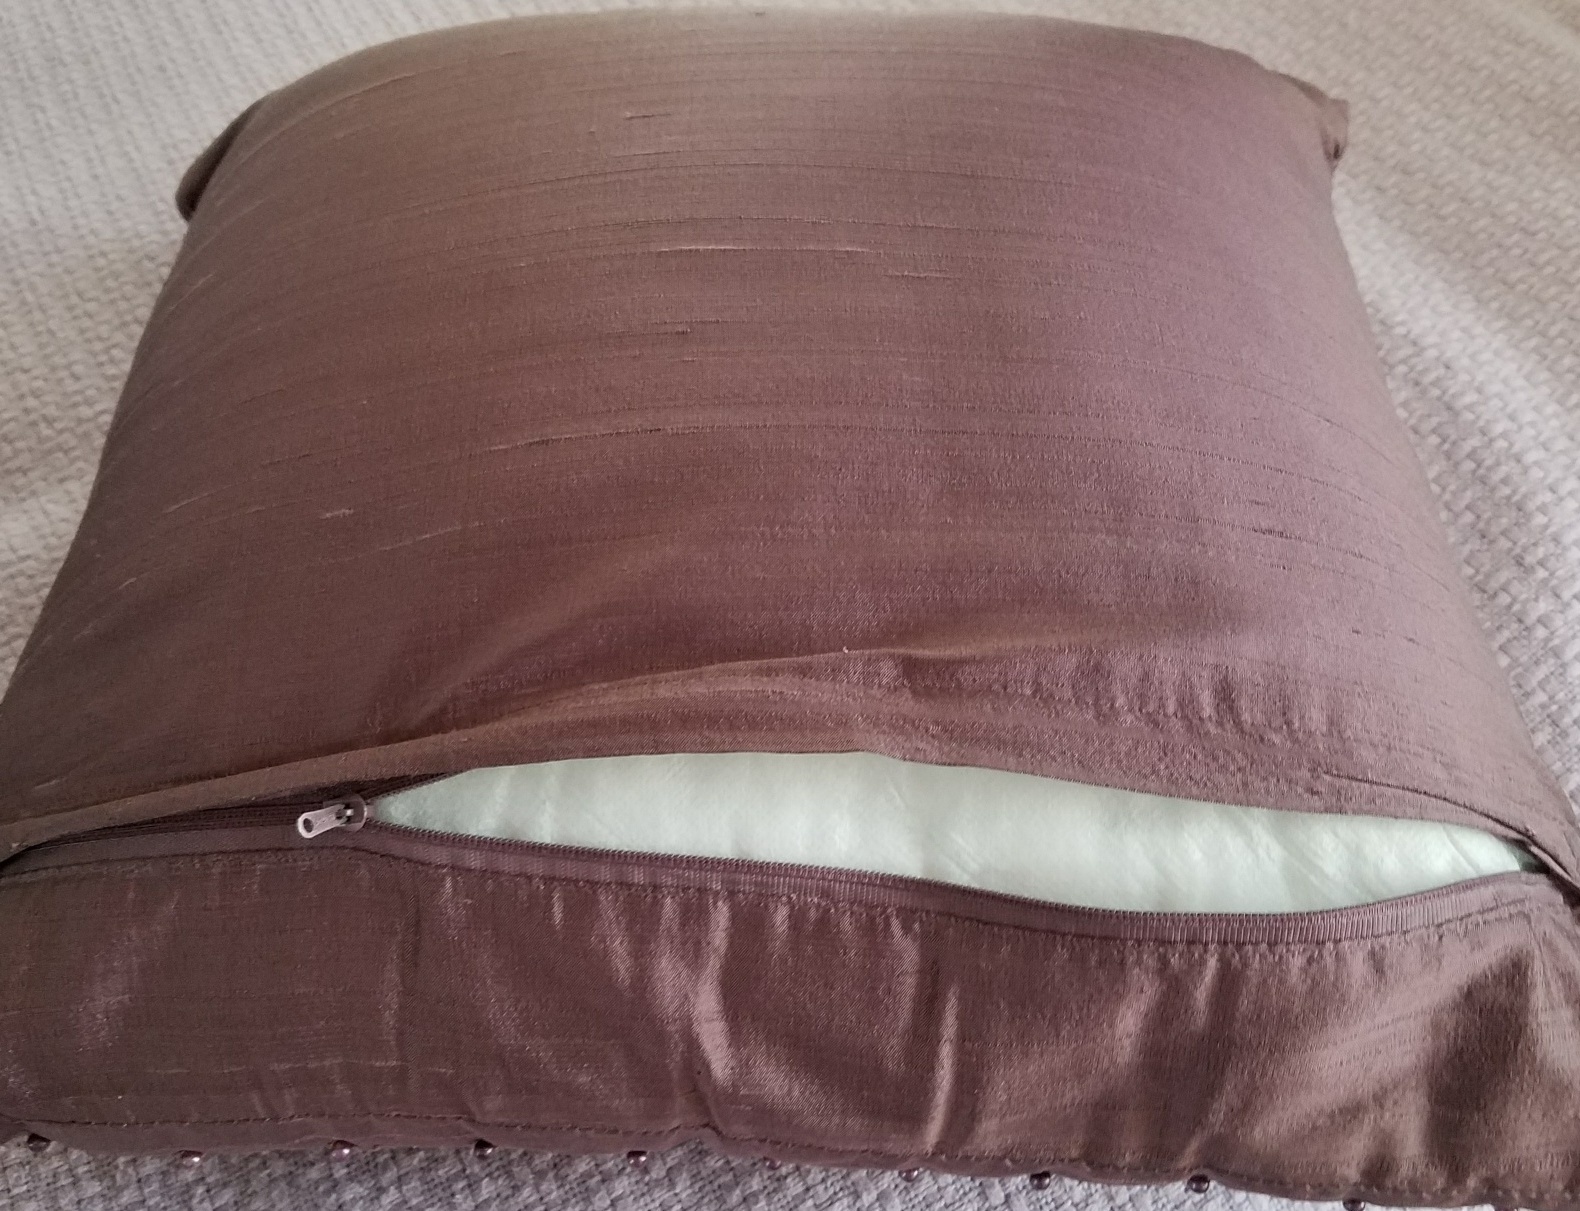
3. is to put a zipper near the bottom to make installing pillow form and removal easy. This is the most secure way to have a removable cover, but you need to be pretty comfortable with installing a zipper.
The envelope style is the most popular finish and to make your cover a little more snug, you can put decorative buttons to hold the folds together or put hidden Velcro on the folds to keep the backing snug.
You options are endless, and you can have or give a pillow that has meaning and is different from “off the rack” ones you can buy in a store.
If you have any questions, please feel free to ask me. Use your imagination and create something really nice and fun.
CHECK OUT MY PAST BLOGS. PLEASE CLICK THE “FOLLOW” BUTTON AND SEE WHAT’S COMING UP NEXT. THANK YOU
The weather is getting cooler, and those flannel PJ’s, quilts and throws are looking pretty cozy about now. Even in the south there are times when flannel feels awfully good. Flannel backing on a cotton top quilt makes your quilt feel so nice and snugly when curled up on a couch with hot chocolate and a good book.
Flannel needs special handling and if you don’t know these things, a beautiful quilt, that you put a lot of work, heart, and soul into, can end up looking awful over time. The most important part of working with Flannel is the prep work. It’s vital to not only pre-wash, but also machine dry and starch, because Flannel shrinks significantly. Continue reading “Flannel Plaid is “Rad””
Hooping can be a mystery to a lot of “newbie” embroiderers and for some old timers who maybe don’t know some of the new techniques. It all really depends on what you are getting ready to embroider. The consensus is that hooping your product is always the best way to have a design turn out with little or no puckering. Sometimes you can’t.
Decisions are made depending on whether the product will get what they call Hoop Burn. (a ring left from the hoop crushing the nap down)
If you are going to embroider a flat or waffle kitchen towel hooping is your best bet. You can use a tearaway stabilizer with 505 spray or Floriani Perfect Stick. For a Red-work style design using Floriani Wet n Gone Tacky wash away type works nicely. Continue reading “To Hoop or Not To Hoop, That is the Question?”


 They say you are only as good as your weakest tool. Well that holds very true for scissors. There are many types of scissors and I think I own them all. One pair of scissors (or shears as they are often called) will not do it! Most of your better scissors are forged stainless steel and hold their sharpness.
 Embroidery Scissors; are generally small, curved or flat, and very sharp. I have several types. Flat is great for trimming threads and small spaces. and are 4 or 5 inches long. There are single curved ones that make it easier to cut into small tight spaces when cutting around applique’ designs. Double curved ones are great for trimming embroidery threads in the hoop, and for trimming around applique’ without taking a project out of the hoop.
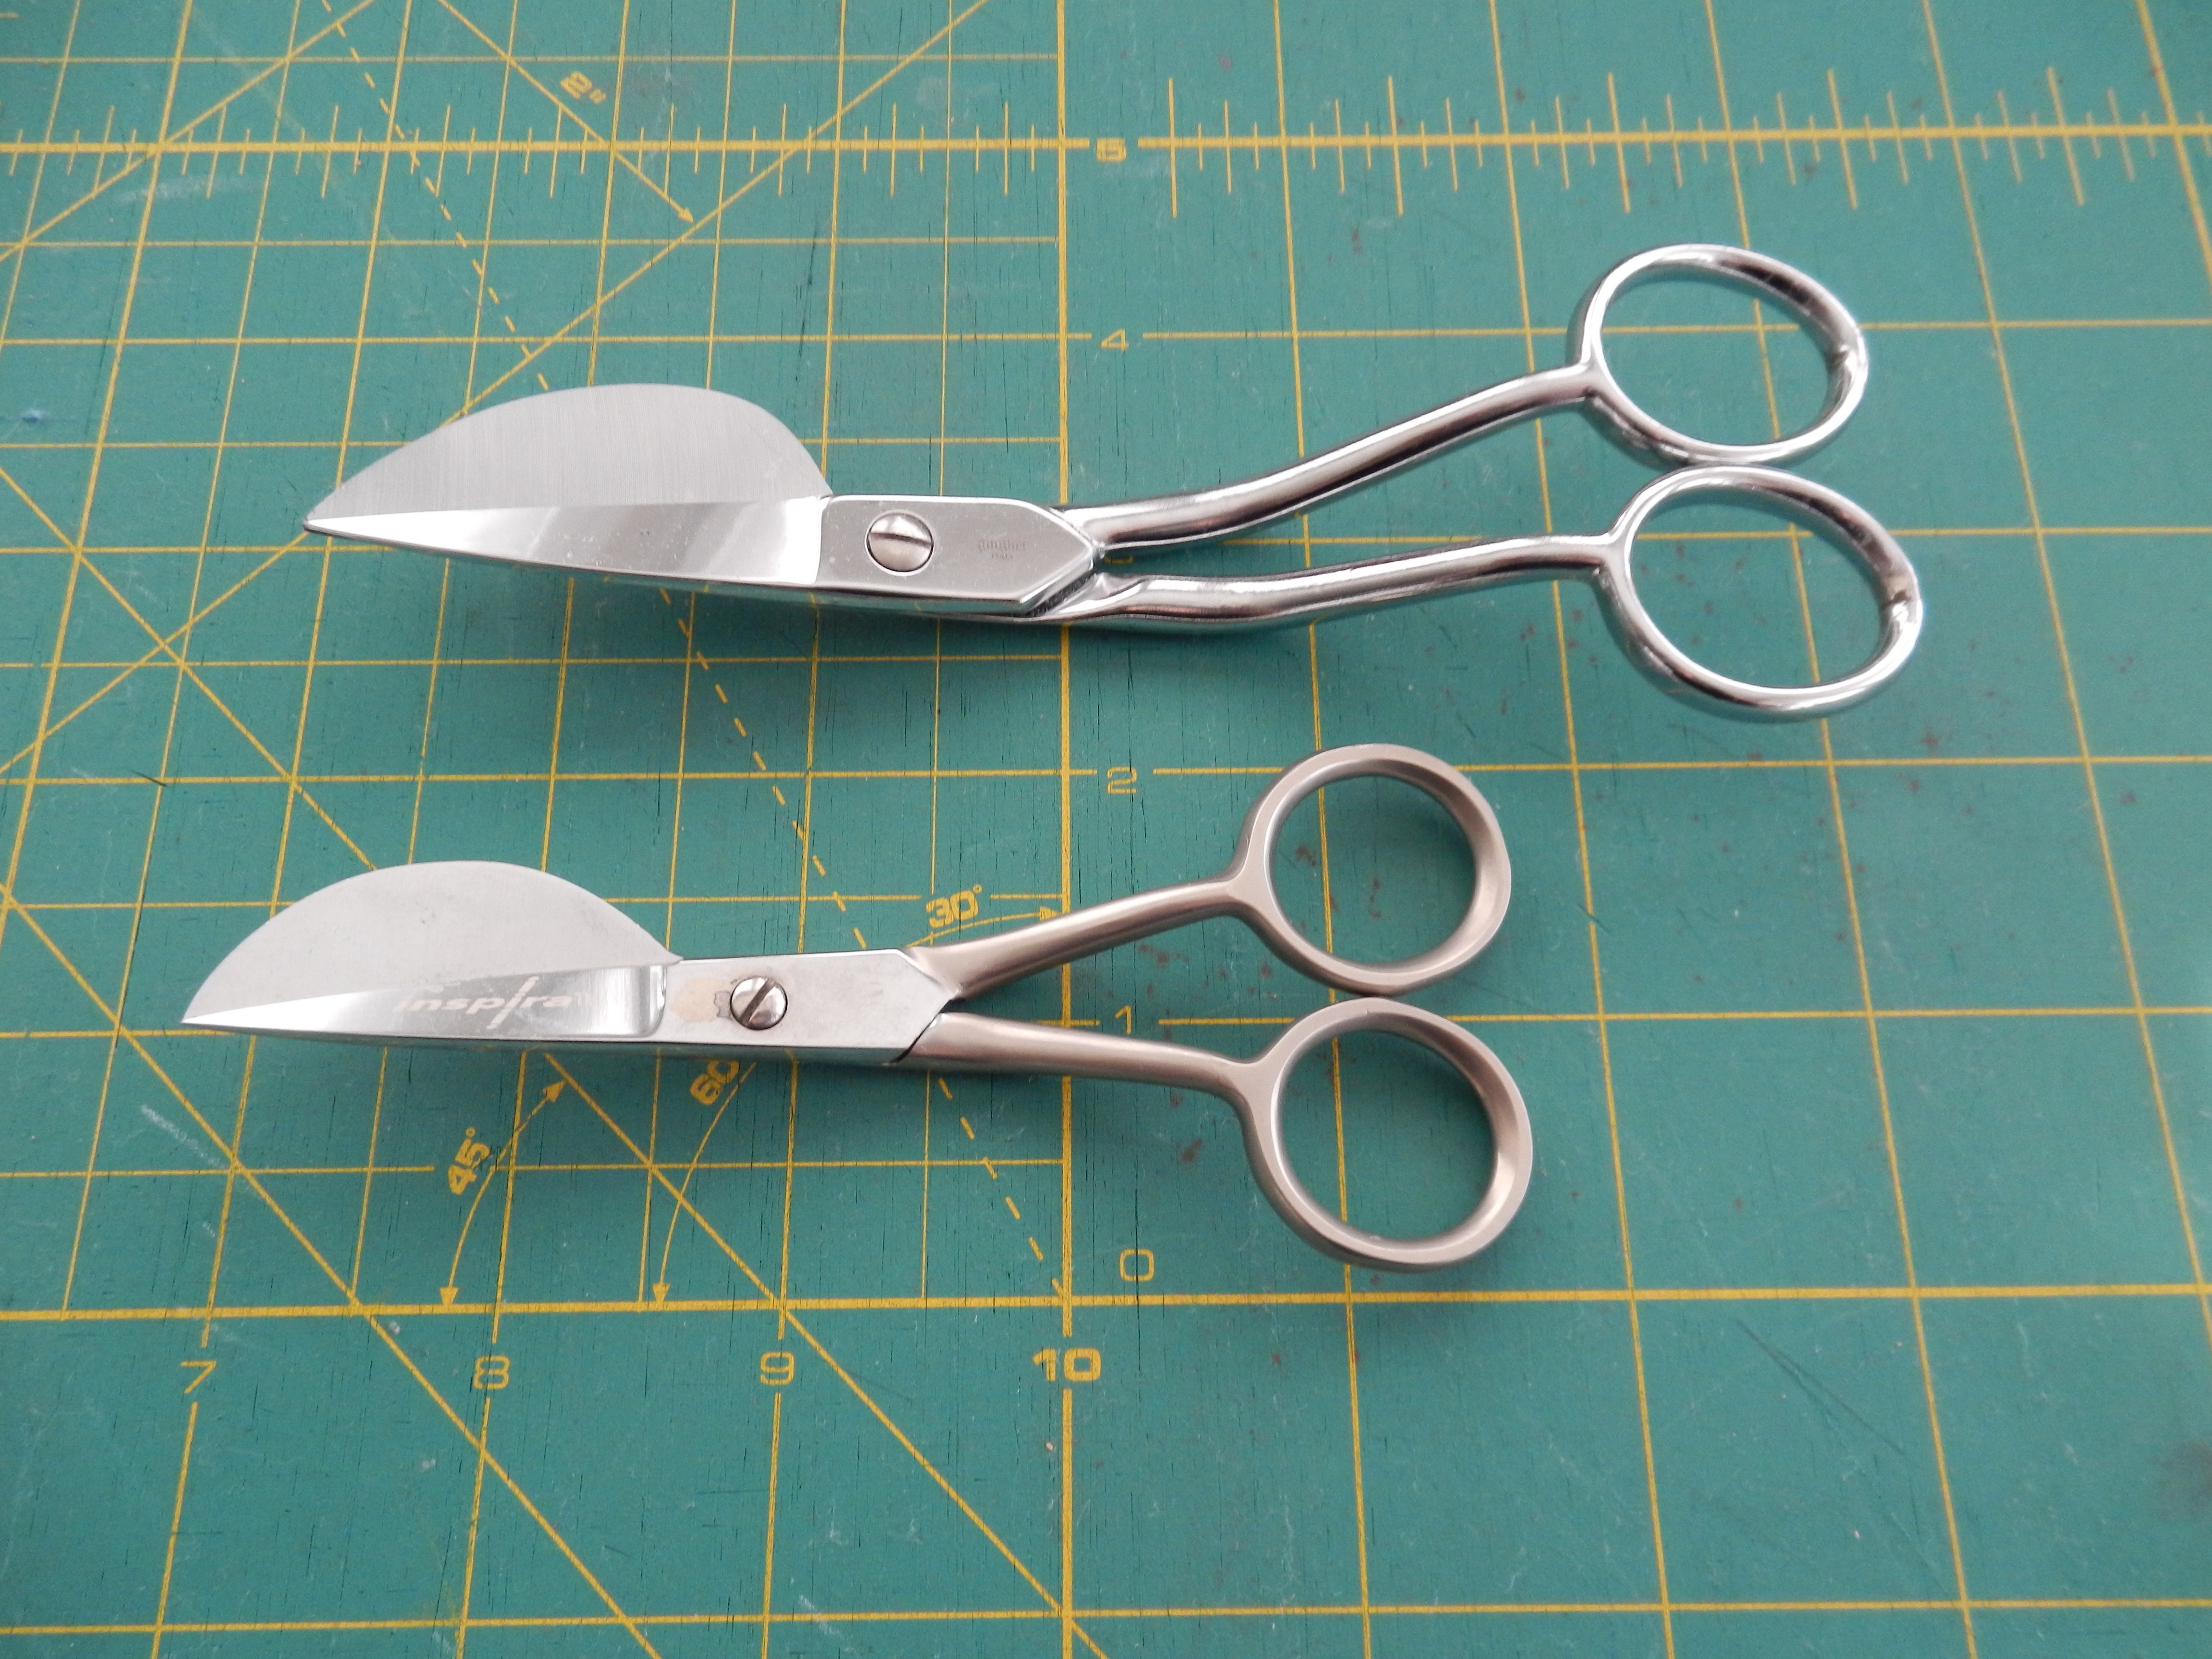
 There are also many novelty scissors out there that are fun for clipping threads, etc. Whatever your needs, I can only suggest you buy good quality scissors for whatever project you are working on. The success of your project depends on whatever your weakest tool is. Good quality scissors will make any project go easier. DO NOT use these quality scissors on paper, – as paper will dull your scissors. Buy cheap scissors for the kids and your husband, and keep your sewing and embroidery scissors in a safe place only you know where they are. (:-)
 embroidered design on it and maybe even a name or monogram. You can purchase quality golf towels from All About Blanks or Discount Embroidery Blanks. They have beautiful velour tops with terry back for wiping hands or golf clubs. Towels also come ready with grommet and hook to attach to golf bag and they have a wonderful variety of colors.
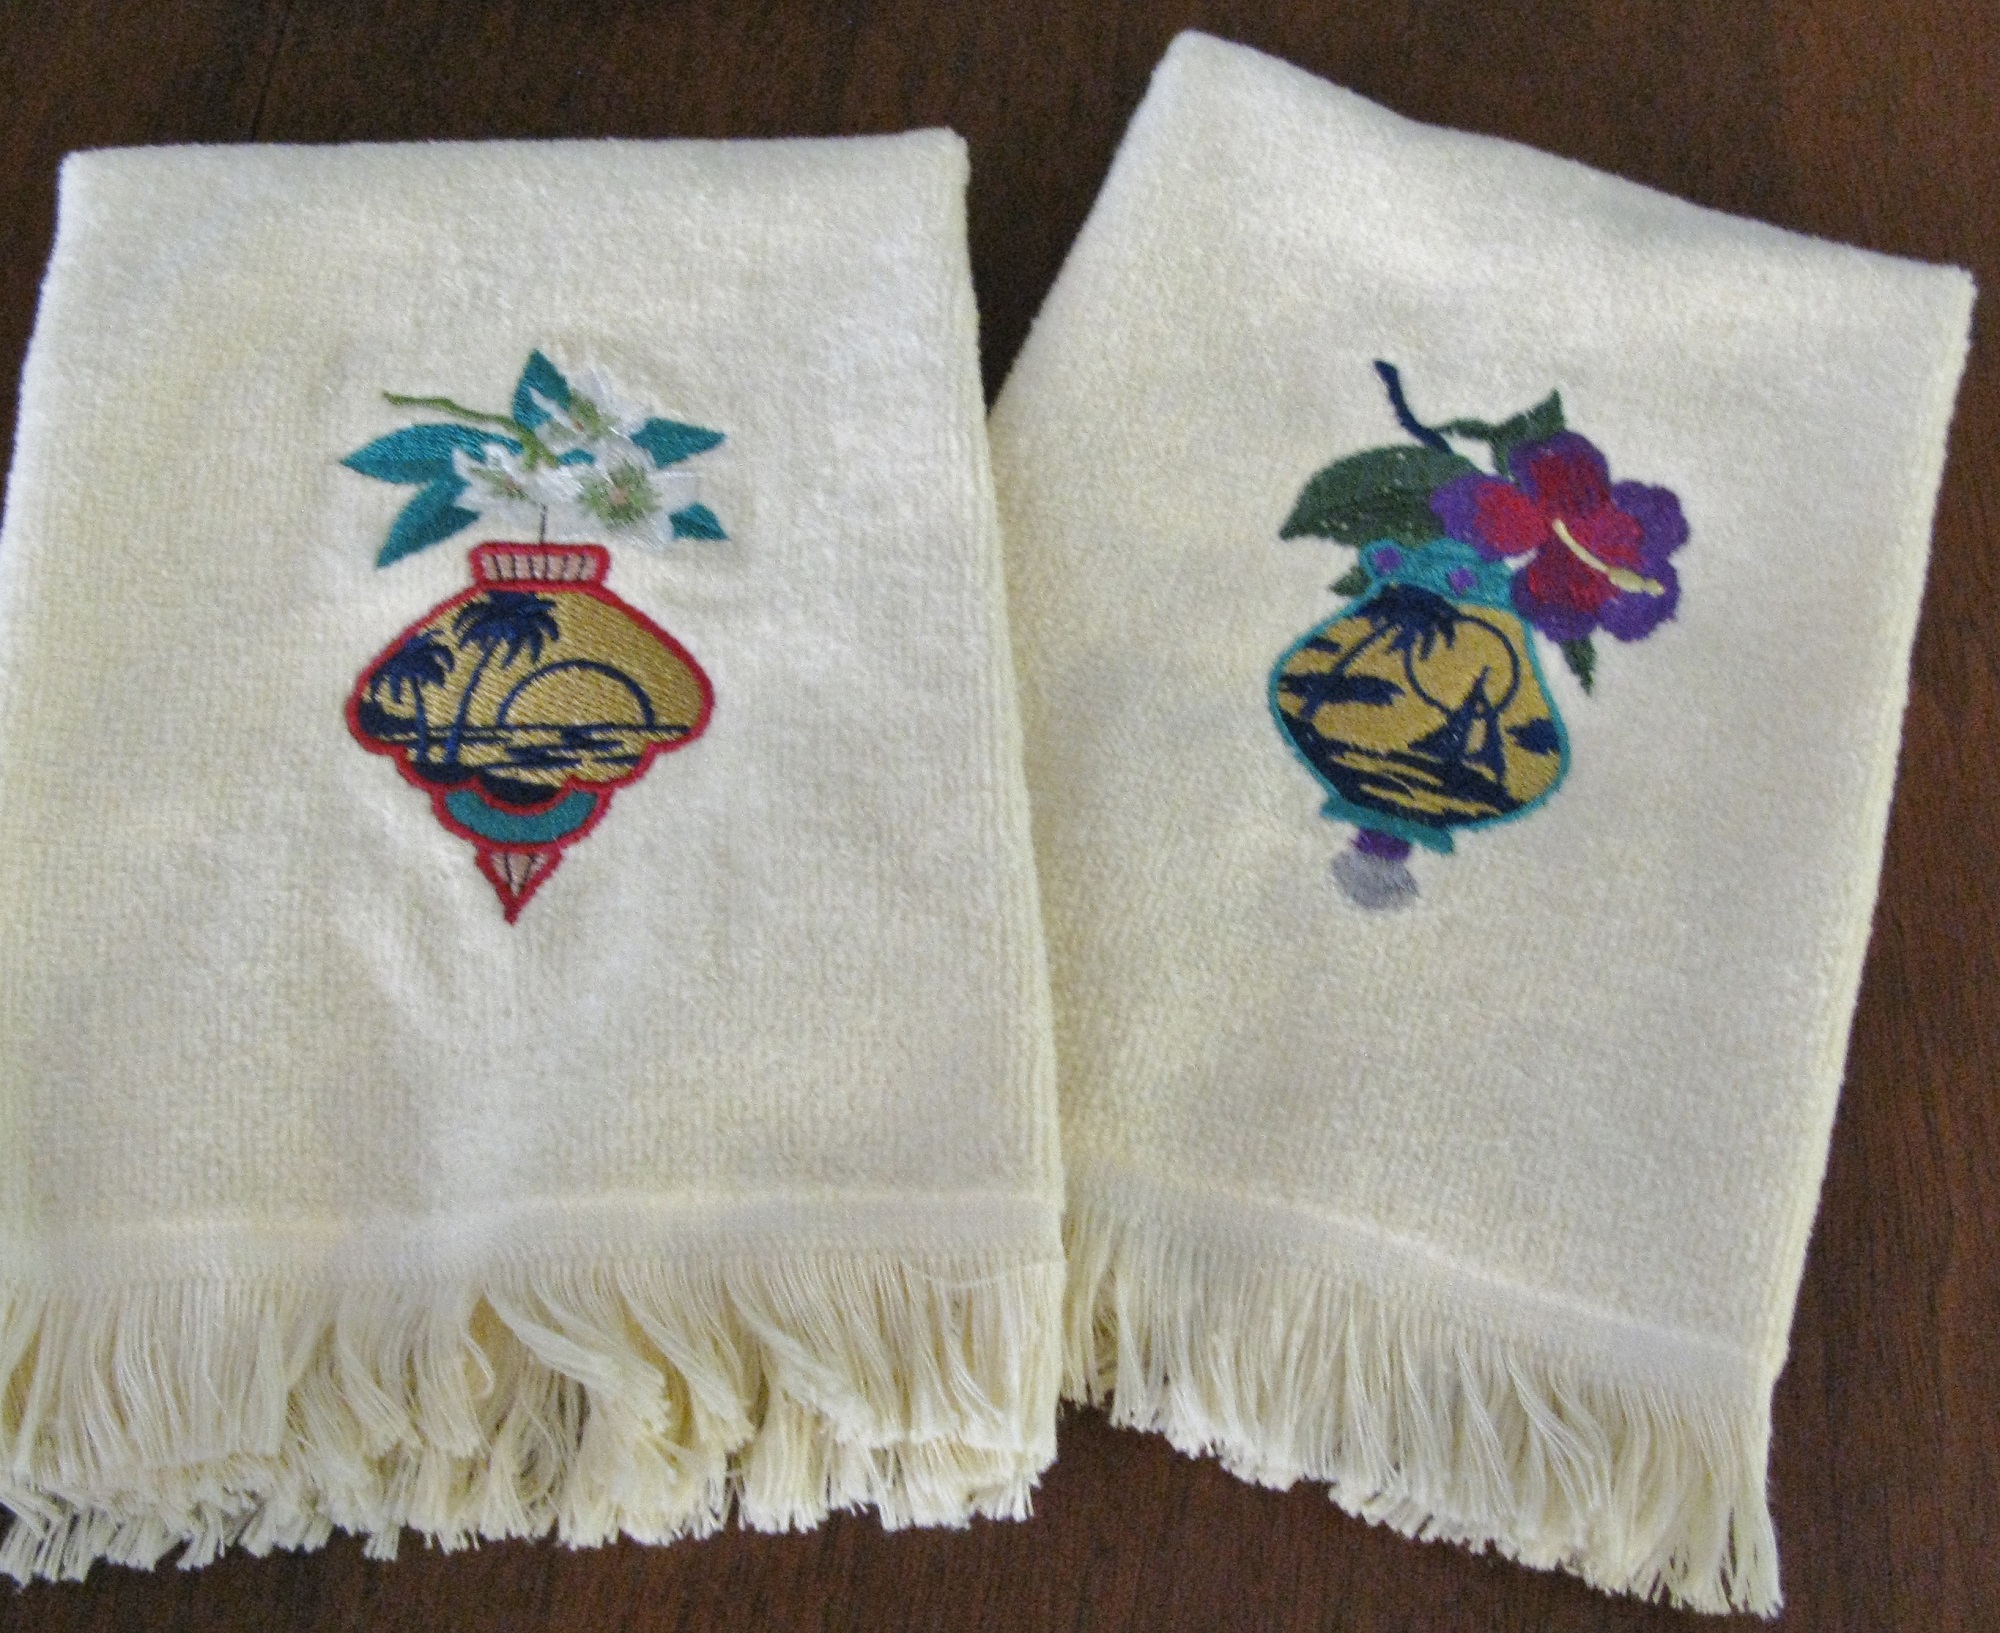 Don’t forget bath room towel sets. Fingertip towels with a pretty machine embroidered design or monogram are great for a powder room. Bath towel sets with an elegant monogram is always a nice Christmas present house warming or wedding shower gift.
 I just did a class where I must have had 10 different questions about thread. So, I thought I would update and re-run this blog with the hopes that it may answer any questions you may have.
 Throw pillows on a couch, a bed or chair are an inexpensive way to add color and decorate a room. The pillows you buy can be quite pricey costing upwards of $40 to $80 or more, depending on what you get. If you want something nice that will last, you will spend a lot of money for them. By making your own, you can also customize your pillow with embroidered words and sayings that mean something to you or the person you are giving it to. Maybe do a small wedding pillow, a friendship, daughter, Mother, Father, or Grandparent design. They will cherish them forever.
 panels with the different branches of the service and I make and quilt the pillow for my friends and their particular branch. Military guys and gals are very proud of their service and this is a way you can honor them. Want to just make a decorative pillow? That’s OK. I’m going to give you a formula that will serve you well for any design.